Run Hyper-V and VirtualBox on Windows 10

I have been using VirtualBox for long time and have setup quite a few VMs for development and testing purposes. I upgraded to the Windows 10 Pro for my main work laptop, and began working with Hyper-V, which is available on a client OS since Windows 8.  Since I use virtualization to do software testing as well development work on daily basis, I was eager to see what Hyper-V could do. Hyper-V have impressed me so far.  It performs well and stays out of my way when I’m not using it.

However, as I have a lot of my previous work in VirtualBox, and rather than try to make all the old VMs work with Hyper-V, it made more sense to continue using them on the original platform (VirtualBox).  The challenge is that VirtualBox and Hyper-V cannot run at the same time.  Only one hypervisor can run at a time, and since Hyper-V runs all the time, VirtualBox always fails as it only runs when launched.

The workaround (there’s always a workaround, isn’t there?) is to disable Hyper-V when you want to run VirtualBox.  I found a few different ways on the web to accomplish this, including altering the registry, and running a command.  But the only one I found that worked involved changing the boot configuration using bcdedit. 

If you run bcdedit with no arguments, you should see a property called hypervisorlaunchtype.  This will be either set to off or auto.
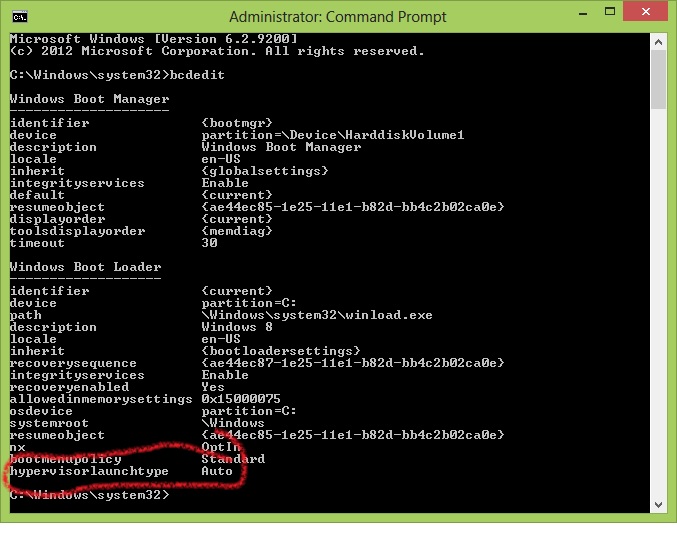
To disable Hyper-V in order to use VirtualBox, open a command prompt as administrator and run the command:

bcdedit /set hypervisorlaunchtype off

You’ll need to reboot, but then you’ll be all set to run VirtualBox. To turn Hyper-V back on, run:

bcdedit /set hypervisorlaunchtype auto

and then reboot.

Netiquettes for Using Web/ Texting Jargon

Knowing when to use jargon in your messaging is about knowing who your audience is, knowing if the context is informal or professional, and then using good judgment. If you know the people well, and it is a personal and informal communication, then absolutely use abbreviation jargon. On the flip side, if you are just starting a friendship or professional relationship with the other person, then it is a good idea to avoid abbreviations until you have developed a relationship rapport.

If the messaging is in a professional context with someone at work, or with a customer or vendor outside your company, then avoid abbreviations altogether. Using full word spellings shows professionalism and courtesy. It is much easier to err on the side of being too professional and then relax your communications over time than doing the inverse.

Capitalize and Punctuate Web/ Texting Abbreviations

Capitalization is a non-concern when using text message abbreviations and chat jargon. You are welcome to use all uppercase (e.g. ROFL) or all lowercase (e.g. rofl), and the meaning is identical. Avoid typing entire sentences in uppercase, though, as that means shouting in online speak.

Proper punctuation is similarly a non-concern with most text message abbreviations. For example, the abbreviation for ‘Too Long, Didn’t Read’ can be abbreviated as TL;DR or as TLDR. Both are an acceptable format, with or without punctuation.

Never use periods (dots) between your jargon letters. It would defeat the purpose of speeding up thumb typing. For example, ROFL would never be spelled R.O.F.L., and TTYL would never be spelled T.T.Y.L.

GitHub Flow

what is GitHub Flow?

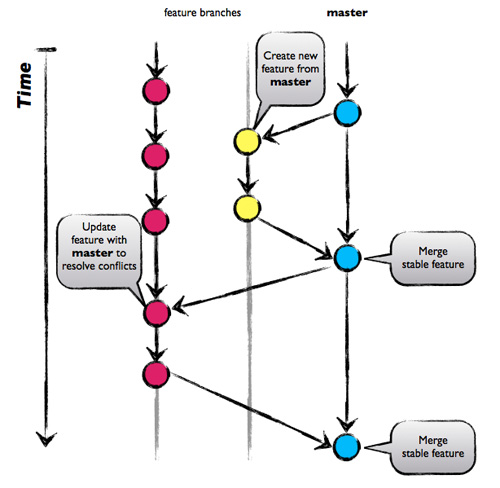
  • Anything in the master branch is deployable
  • To work on something new, create a descriptively named branch off of master (ie: new-oauth2-scopes)
  • Commit to that branch locally and regularly push your work to the same named branch on the server
  • When you need feedback or help, or you think the branch is ready for merging, open a pull request
  • After someone else has reviewed and signed off on the feature, you can merge it into master
  • Once it is merged and pushed to ‘master’, you can and should deploy immediately

That is the entire flow. It is very simple, very effective and works for fairly large teams.

So, let’s look at each of these steps in turn.

#1 – anything in the master branch is deploy-able

#2 – create descriptive branches off of master

#3 – push to named branches constantly

#4 – open a pull request at any time

#5 – merge only after pull request review

#6 – deploy immediately after review

To read the full article by Scot Chacon please click here.